![]()
Paint
The car had been repainted once. It had a thin coats of primer and color over the original paint, probably a cheapo job, and there were further coats over old damage. Because that would be a questionable surface for a repaint, I stripped the existing paint to bare metal. Even in places where I could have justified painting over the existing finish, there often was light to moderate surface rust, and sanding it all off and treating the underlying metal seemed the best way to be sure it was gone.
The paints were purchased from Eastwood. I used a two-primer system followed by a single-stage urethane. The car was first painted with an epoxy primer, which adheres well to bare metal (and to damn near everything else). On visible surfaces, that was followed by a polyurethane primer/surfacer, which can be built up and sanded for smoothness. The epoxy primer was pretty nice, but I wasn't completely happy with the polyurethane primer. When first applied, it had a rather coarse texture, unlike the Custom Shop primer I have used in the past. In any case, the polyurethane primer always was sanded to a smooth surface, so it didn't matter much in practice. I chose their Euro Racing Green single-stage polyurethane for the color coat; I think that two-stage paints make a 1960s car look over-restored.
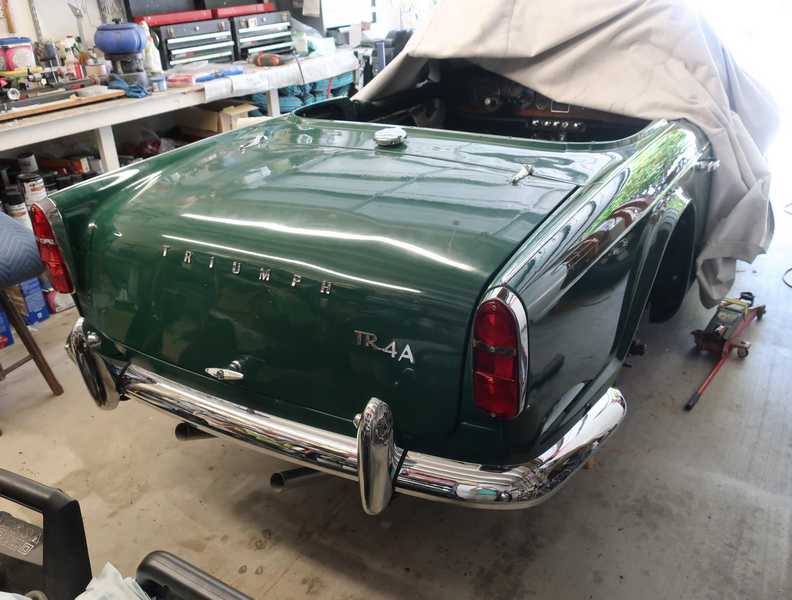
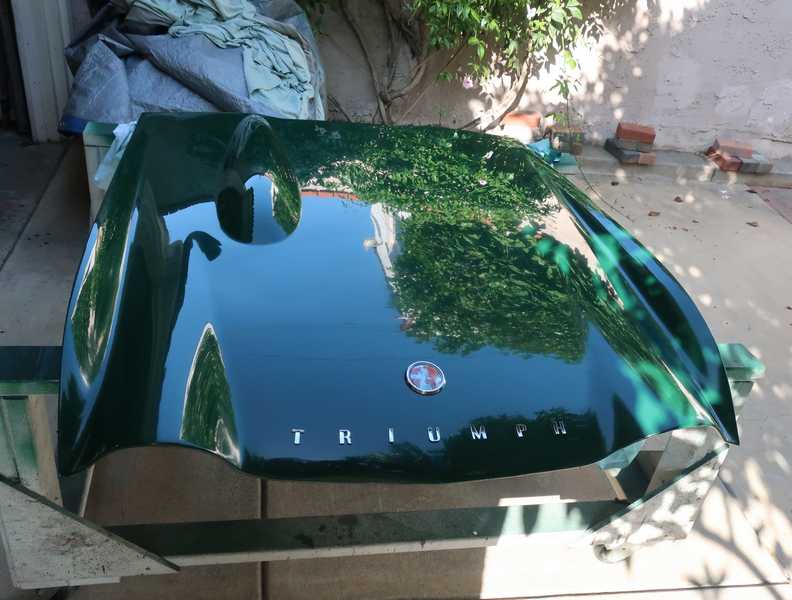
In most of the pictures, the camera's flash makes color looks much lighter than it really is. It's actually a darker green, closer to the color in a few pictures where a flash wasn't used; for example, the trunk lid, below.
Click on any picture to see a larger version in a new window.
Contents
- Paint Safety
- Factory Paint
- Paint Removal and Epoxy Priming
- Body Filler
- Body Sealers used in the TR4A
- Wheel Wells and Door Thresholds
- Engine Compartment
- Trunk
- Interior
- Underside
- Outer Surfaces
- Trunk Lid
- Doors
- Fenders
- Hood
Paint Safety
Yeah, I know, everything you buy these days comes with a string of breathless safety announcements that treat you like a complete moron. My favorite is the cardboard windshield sun screen that warns you not to drive with the screen in place. Anyone stupid enough to do that is a genuine Darwin Award candidate, so the warning is probably wasted on him, anyway.
But when it comes to auto paint, these warnings actually are important. Really important.
All paints contain grody solvents and other bad stuff, which you really shouldn't breath. But polyurethane paints are in a nasty-class by themselves, as the hardeners contain isocyanates. Those are essential, as they are the linking agents in the polyurethane polymers, and they are deadly. If you paint with polyurethanes (which is what virtually all car paints are today), you must use a respirator that is OSHA-approved specifically for isocyanates. Just painting outdoors is not good enough.
As I've explained in a number of places, this site is not a tutorial, and I will not present a set of instructions for using paints safely. This section, therefore, is a warning, not a set of safety instructions. With any paint, but especially with polyurethanes, be sure to read all the safety information in the paint's data sheets, educate yourself about paint safety, and respond accordingly.
As for me, I painted all the car parts outdoors and used a positive-pressure, fresh-air system. That was especially effective; when using it, I couldn't smell the paint at all. I used it while spraying paint, of course, but I also wore it while mixing paint or whenever a paint can was open.
Factory Paint
I've never read a clear description of how the bodies were painted at the factory. I have thought about this quite a bit and concluded the following: after stamping, the panels were painted with a thin primer that did not interfere with their spot welding, and the body was painted after assembly. Trim pieces were added later, apparently by loosening panels if necessary. For example, the fenders were loosened so their upper trim strips could be attached. It is telling that the fenders' mounting screws were painted over.
Evidence of this process is in parts of the car that had the early primer coat but were never painted further. You can see this in the area of the body ahead of the A pillar, which became closed off after the body was assembled. It has no finish paint at all. It is evident also inside the fresh-air plenum, between the spare-tire well and rear fascia, and the far rear end of the rear wheel well. In particular, the surfaces where the fenders meet the body were not painted, beyond the early primer. This explains why today they are common rust areas.
My car had been repainted once, apart from body repairs. The outside had a second layer of paint, but the inner areas, such as the wheel wells, underside, and engine compartment, had only original paint. The second layer was a single, thin coat, suggesting that the car was probably painted by one of the low-cost car painters.
Paint Removal and Epoxy Priming
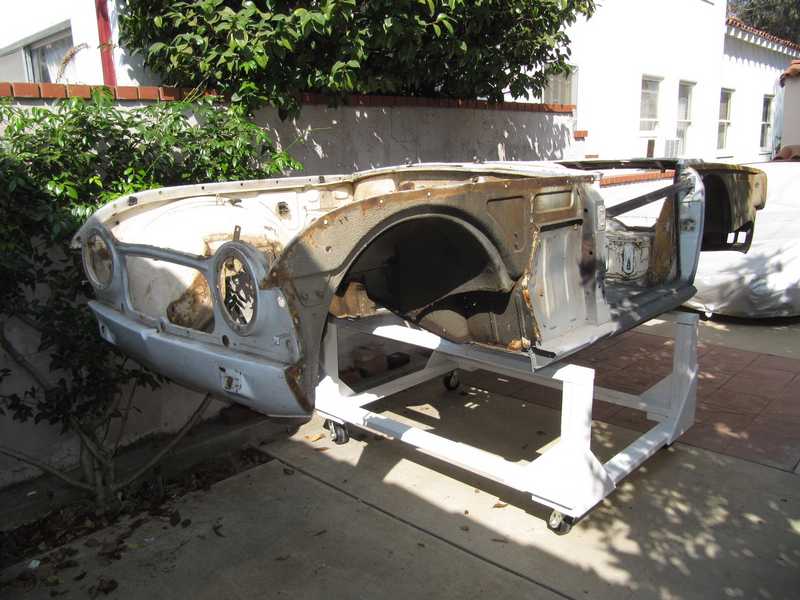
Here's where it began. The floors and rockers have been replaced, a lot of small rust areas have been fixed, and the body has been placed on a cart for ease of access.

I decided to strip the car myself. I chose not to have the body blasted or chemically stripped, because the logistics were daunting, the cost would have been high, and I knew of no local shops that did that kind of work.
I recognized, at the outset, that certain parts of the body would not be easily accessible, and thus could not be stripped completely. The epoxy primer is a good choice in that situation, as it adheres well to both paint and unpainted metal, as long as the surface is clean, rust-free, and sanded to a matte finish. It's easy to use and, properly applied, provides good rust protection.
I decided to do the epoxy priming in stages: strip and prepare a section of the body, prime it, and go on to the next section. If I had tried to strip the body completely before priming, the first part would have started to rust long before I got to the last part.
I experimented a bit with methods for stripping the body. The following process worked well:
- I used two techniques to remove undercoating: (1) a knotted wire brush on an angle grinder, and (2) a heat gun and a vibratory multitool. Mostly, I used the latter. To remove remaining undercoating residue, I washed the area with mineral spirits.
- I stripped most of the paint with a polycarbide abrasive disk on an angle grinder. It took the paint off quickly and easily and left a lightly abraded surface, which provided good adhesion of the epoxy primer. Unlike coarse sandpaper, it didn't dig into the metal. The disk worked best on a flat surface; for curved surfaces, and places that the disk simply couldn't reach, I used wire brushes on either my angle grinder or an electric drill, media blasting, or hand sanding. I went through about 35 disks.
- In a few places, I used media blasting, as little as I could get away with, because I hate media blasting.
- In less accessible rusty places, I hand-sanded and applied a coat of rust-converting primer or rust encapsulator. Professional painters sneer at this practice, I know, but according to the manufacturers of the products, epoxy primer can be applied over them. I don't expect the adhesion to be better than that of the rust converter or encapsulator, of course, but the alternative is to prime over areas with imperfect rust removal, which is not likely to be successful. Other products exist for dealing with rust pits and such. Professional painters like to argue about what is best, but seemingly with little hard evidence.
- I washed the stripped area with a pressure washer and strong detergent. Of course, I dried it well and quickly, then gave it a quick once-over with wax and grease remover.
- When the stripping and cleaning were finished, I applied any necessary body filler.
- Finally, I cleaned the area again with wax and grease remover and primed it with two coats of epoxy primer.
Old auto paints used a lot of lead (so do modern ones, actually), so I wore a respirator for all the stripping.
Body Filler
I have to say something about body filler.
Evaluations of classic cars seem to be heavily influenced by people who have little real knowledge, but have picked up a couple scraps of conventional wisdom and blather on about them incessantly. Among these are the concept of a "numbers matching" engine, the importance of perfect panel and door gaps, and a horror of plastic body filler (often called Bondo, the name of one well known brand).
In reality, it is almost impossible to do decent job of auto painting without using body filler. Although (I'm told), some high-end restorers do not use it, they fill small irregularities with high-build primer, which is just body filler by a different name. The proper use of filler is to fill irregularities after they have been hammered out as well as possible, and to fill the inevitable imperfections after welding new body panels. It is literally impossible to smooth a repaired panel perfectly by hand, as an imperfection of only a few mils is easily visible. At least a little filler is invariably essential.
Modern fillers are amazing materials: they adhere beautifully, can be sanded easily to virtually perfect smoothness, and can be feathered out to zero thickness without creating visible edges. The problems come with misuse. It is easy to use fillers for a fast and sloppy repair, in which a thick layer of filler is used to fill a dent that rightly should be pulled or hammered out. Sometimes, it's even used to fill rust holes. In commercial body repair, time is money, so it is easy to understand why body shops take these shortcuts. The customer can't see under the paint, and the job will certainly outlast the warranty period; no one will complain. Eventually, though, the too-thick filler may crack or come loose. Then, a new repair is needed.
There was a lot of inappropriately used body filler in this TR4A. For that reason, I sanded all old repairs down to clean metal and discovered that many were inadequate, with too-thick filler or filler applied over rust (!). I redid them all. After all the work I put into the body, I had no desire to leave anything half-assed.
Body Seam Sealers Used in the TR4A
The TR4A body had been gooped up with a lot of seam sealer. I didn't think it would be safe to paint over it, so it had to go. Where appropriate, I replaced it with a modern, paintable sealer.
I encountered two kinds of sealers. The first was a black, tar-like sealer, not unlike the undercoating, used extensively throughout the car as a seam sealer. This appears to be called Seelastic in the shop manual. It apparently was applied after the paint, but it still had some kind of coating, maybe paint, presumably to prevent it from looking too obvious. The second was a strange, hard brown sealer, possibly Supra Dedseal, used at various points throughout the body, mainly to fill larger gaps. I was most concerned with the tar sealer, as the hard sealer probably could be safely painted, but not the tar.
The body section of the shop manual indicates that a couple more sealers were used. The most common was called Plastisol, apparently a kind of putty used between spot-welded body panels. These were used mostly in inaccessible places, so they are not really a concern.
The picture below shows the tar-like sealer used on seams in the firewall behind the dashboard.

The tar sealer often was not accessible for heating and scraping, but paint remover, followed by a mineral-spirits wash, took it off easily. The first picture below shows sealer around the left rear wheel well, viewed from inside the trunk, with paint remover applied. The second one shows the finished seam; the original sealer is gone. A little paint, which was under the sealer, is still visible. Paint remover seemed to soften the original body paint a bit but didn't remove it.


The use of body sealer in the TR4A was not well thought out. There was plenty of sealer where it didn't do a lot of good, but none in many places, such as the inside lower edge of the trunk lid, where it might have been effective in eliminating the body's water traps.
Wheel Wells and Door Thresholds
I started with the left front wheel well. The first picture below shows the paint and undercoating partially removed. I used the knotted wire brush here, but later I used the heat gun and powered scraper, as that combination usually was faster. In the second, the area is stripped; the camera makes the surface look like it has not been completely stripped, but it doesn't appear that way to the eye. The surface looks mottled because of paint dust on the stripped areas.


To fill the pits in the threshold, and some irregularity from the rust-repair welds, I applied a smear of body filler and sanded it smooth. the pictures below show the left and right thresholds with body filler and the TR6-style door gussets.


I washed the stripped areas first with detergent in a pressure washer, then grease and wax remover. Finally, I sprayed a couple coats of epoxy primer.


The forward part of the rocker panel is a water trap and thus an area likely to rust. To prevent it, I treated it as I did the floors, with a very tough, rust-resistant paint. I sanded it lightly and primed over it.

Finally, the thresholds with three coats of the color paint. The actual color is darker than it appears in these pictures, at least on my monitor.


Below are the rear wheel wells. On the left, the bulk of the undercoating has been stripped from the left-side well, but a lot of tarry residue remains. In the right two pictures, that residue has been removed with mineral spirits, messy but effective. A little light rust is visible at the rear of both wells; apparently, the undercoat didn't get all the way to the rear of the cavity, where it actually might have done some good. The far right picture is the right-side well, stripped of its undercoating. It shows similar rust.


The rust in the rear of the wheel wells is interesting. It looks like that area was never painted completely, as if it were painted after the fender was installed and the paint spray didn't quite reach the far end of the well. The rusty, upper seam also shows no evidence of paint. The front fenders similarly show indications that they may have been painted after assembly. If so, it explains why certain areas, such as the upper seams of all fenders and rear parts of the rear fenders, are common rust areas.
The top couple inches of the inside of the rear valence is another minimally accessible spot, which I doubt was well painted--or painted at all--at the factory. I could reach up between it and the trunk's spare-tire well and feel rust. I treated that rust by brush-painting it blindly with rust converter, then using a detail gun to force paint as far in as I could. That's the best I could do.
I stripped the paint from the wheel wells in the usual manner. Sanding with the polycarbide disks did not remove all the rust, as there was a fair amount of pitting, so I applied two coats of Eastwood rust encapsulator. I'm confident that this will prevent the area from rusting again.


I cleaned, scuff-sanded, and epoxy primed them at the same time as the rear underside.


I was uncertain about using the polyurethane primer on the less-visible parts of the body. Obviously, it is not needed as a surfacer, but might have provided a little more protection. Still, I certainly was not going to hand-sand another layer of primer unless I was sure it was needed. As an experiment, I gave the left front well two coats of polyurethane primer and three color coats with no intermediate sanding. I didn't like the result; it looked OK for a wheel well, but would not be acceptable for anything visible. I used the inside of the trunk lid for a similar experiment, with similar results. In the end, I chose to paint these areas directly on top of the epoxy primer.

Here are the rest of the wheel wells, panted on top of epoxy primer. They look fine.


Engine Compartment
Because of their complex shapes and inaccessible areas, the front grille support and valence were a pain to strip and paint. The front of the car clearly had a rough life; I found some body filler in the valence, indicating previous damage, and minor dents suffered subsequently. I didn't try to smooth out the slightly irregular areas, as they weren't bad and, in any case, would be largely out of sight once the car was completed.


In the parts of the engine compartment it could reach, a polycarbide stripping disk on an angle grinder took the paint off easily. Much of the engine compartment, however, was inaccessible to it. In those areas, I used a combination of wire brushes in either the angle grinder or an electric drill, along with simple hand sanding. Below, the engine compartment, not quite completely stripped.


I cleaned the engine compartment in the usual way: a pressure washer, first with strong detergent and then a clean-water rinse; quick drying with compressed air and towels; and finally, right before painting, grease and wax remover. In the pictures below, it has received a couple coats of epoxy primer.


And, finally, painted.


Trunk
The trunk required an inordinate amount of time and work. Because of its complicated shape, lots of inside corners, and the use of sealers, it was difficult to strip, and many of the rusty spots were not easily accessible. The bottom of the spare-tire well had a large rust repair, which required a fair amount of prep work to get it decent looking and ready for paint.
Below, the stripped trunk and the areas smoothed with body filler. Rust-converting primer has been used to fill pits, where rust is difficult to remove.


After patching the bottom of the spare-tire well, I found and repaired more rust in the lower forward edge. Here is a detail of that rust repair, with body filler applied.

Finally, the trunk with a couple coats of epoxy primer.


I scuff-sanded the epoxy primer and painted over it directly. The repairs are inconspicuous but not invisible.


Interior
There was quite a bit of surface rust in the footwell areas, as well as old carpet glue and loose paint. The pictures below, taken as the car was being disassembled, show what I had to deal with. Although ugly, the rust was only superficial: no deep pits and only one spot of penetration, in the battery box, and I wasn't sure that was really rust.


I stripped the surfaces in the front of the passenger compartment in the usual manner, with a wire brush and polycarbide disk. They took the paint and rust off fairly easily. I washed it with strong detergent and dried it quickly to prevent new rust from forming.

Reflections from the surface make parts of it look black or white in the pictures, but, except for a couple minor inaccessible spots, it is completely stripped.
The inside of the fresh-air plenum had a fair amount of surface rust. It was not easily accessible, but I was able to hand-sand almost all of it one way or another, removing the worst of the rust and abrading the remaining paint, which I didn't try to remove. The area is difficult to paint and probably left the factory largely unpainted. I applied rust converter to the plenum interior and to other areas where I had removed rust.
Some of the body seams clearly needed resealing, so I brushed sealer on all of them, even ones that seemed unlikely to leak. It's cheap insurance; you never really know what will leak and what won't until you feel that drip on your shoes.


I stripped the rear of the passenger compartment. In a couple places, my scraper actually slipped into the gap between spot-welded panels, so it was clearly necessary to seal those seams, as well.


Sometimes you have to fix a problem, even if it results in something that isn't original. Originally, the car's interior was painted the same way as the exterior, which left it vulnerable to rust. I wanted to prevent the rust damage that resulted from that practice.
I painted much of the interior with rust-resistant paint. That included the floors, sills, and the part of the body that covered the rear axle. The latter originally was covered with hard rubber pads, which were excellent water traps; I'm amazed that it didn't rust more. I also painted the wheel wells and parts of the doorposts. The wheel wells are not likely to rust, of course, but since I painted everything around them with the antirust paint, it seemed simplest just to paint them as well. Those body areas are all out of sight, covered by the car's interior panels and carpet, so there is really no reason to worry about their appearance.
In the pictures below, the floor has not been painted. That had to wait until the seat mounts were installed, as they required welding.


I primed the front of the passenger compartment with my usual epoxy primer. Since that area is semi-visible, I planned to paint it body color.


I made no attempt to mask the rust-resistant paint, as it's compatible with epoxy and even polyurethane paints. I didn't paint over it, but also didn't worry about a little overspray.
Once the seat mounts were in place, I painted the floor. The antirust paint provided a very tough coating. Between that and its galvanized surface, I can't imagine it ever rusting again.

There wasn't much left to paint but the footwells and the area that will be behind the dash. I made no effort to mask the floor, as those areas will be under carpets, so overspray won't be visible.


Underside
For access to the underside, I used my crane to tilt the body. To fit the crane's legs under the cart, I raised it a couple inches and blocked it from rolling. A pair of C clamps, clamped to the cart, prevented the body from sliding. This worked, but it was awkward. If I ever do this again, I'll take the time to make a rotisserie.

The welds for the new floors had rusted, so I sanded and wire-brushed them, then coated them with the same antirust paint I used on the floors. Earlier, I had cleaned out the drive-shaft tunnel and the channels along its edge; a tedious job. The lines of white dots on the underside of the floors were created when the seat mounts were welded; they were zinc oxide, resulting from the reaction between the zinc coating and atmospheric oxygen at welding temperatures. I simply wiped it off, as it was just a powder.


I stripped the paint and undercoating from the underside in the usual manner, then treated the welds in the spare-tire well similarly. I did the rear wheel wells and the rear underside at the same time. Getting rid of all the remaining bits of undercoating was a chore. In many places it was not accessible to power tools, so I used paint stripper followed by a mineral-spirits wash. After all that, the parts of the underside that I couldn't reach with a polycarbide disk had to be hand sanded.

After cleaning the underside and rear wheel wells with strong detergent, a power washer, and finally going over it twice with grease/wax remover, I primed the entire area.That U-shaped bracket in the first picture was an absolute bitch, not nearly as accessible as it looks. I had to hand sand it and use paint remover to get it clean; then, it was difficult to spray paint inside and behind it.


That U-shaped bracket supports the rear of the body on the frame. The body experiences cyclic loads at that point, so it is no surprise that fatigue cracks appeared on both sides. Although I welded the cracks, I didn't try to reinforce those areas. I suspect that cracks might reappear in another half century or so.
The undersides of the floors were new, galvanized metal, so they didn't need much prep work.


I painted the underside directly over the epoxy primer, scuff-sanded. The underside had received three coats of epoxy primer, plenty for a good substrate, and I applied three coats of color.
Below, the underside of the right floor, viewed from the front.

Here is the rear underside. You can see the patch in the spare-tire well pretty clearly, as I didn't try to make it invisible. But, who cares? It's the freakin' underside, fer chrissake!


I painted most of the underside with a full-sized gun, but did parts with the detail gun. One of those parts was that annoying U-bracket, which came out OK, I think.

Outer Surfaces
These are the surfaces visible from the outside of the completed car. I don't care much about the appearance of the paint in the wheel wells or engine compartment, but I do care about these. They were treated carefully.
It was clear that the car had been repainted at some point, as the paint in these areas had an extra coat of primer and white paint. That finish coat was very thin, much thinner than the factory paint, and easy to remove. Only the outermost surfaces had this second coat; there was none inside the trunk, for example, typical of a cheap paint job. I suspect that the car was repainted at one of the cheapo places that we all know about.
Below, the upper outside surfaces of the body have been stripped and a few minor dings have received a skim coat of body filler, not yet sanded.


The rear valence had been damaged and repaired. When I took off the paint, I took off most of the body filler from that repair, so I had to replace it. The pictures below show the replaced filler unsanded (left) and sanded (right).


Primed and painted, the repair is invisible.

Here is a minor rust repair, done several months earlier and sprayed with rattle-can primer for temporary protection. I took off the old primer, gave it a coat of body filler, sanded it, and epoxy-primed it.


Finally, like the rest of the rear deck, it was painted with polyurethane primer, block sanded, painted, wet-sanded, polished, and waxed.

Below, the front and rear outer areas have received two coats of epoxy primer. At this point, the stripping and epoxy priming were finished.


Like all visible surfaces, the front and rear received two coats of polyurethane primer, sanded with 320-, 400-, and 600-grit papers. Then three coats of paint.
In the first picture below, the left half of the rear deck has been wet sanded with 1000-, 1500-, and 2000-grit paper, and the right half has been polished with Meguiar's 105. The difference is dramatic. Finally, the second picture shows it finished, after wet sanding and polishing with 105, 205, and finally carnauba wax.


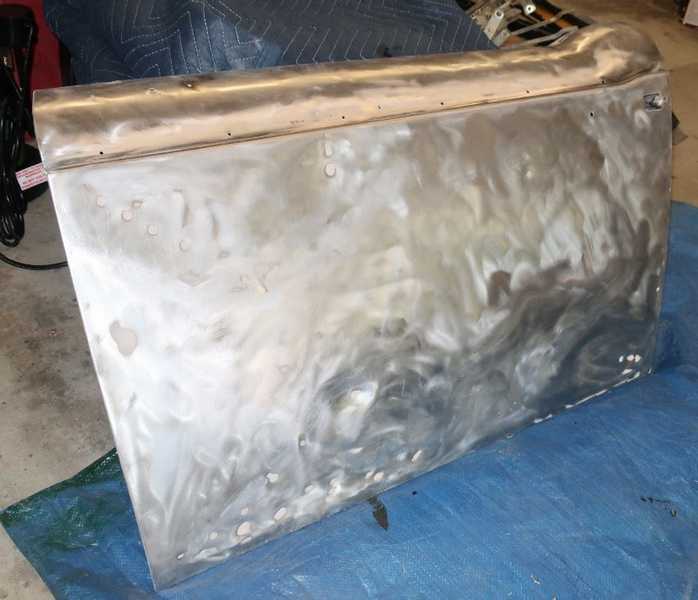
Trunk Lid
The first part of the car I painted was the trunk lid. I needed to experiment a bit with a new paint gun and unfamiliar paints, so the underside of the lid, whose appearance was not particularly important, seemed a good place to start. The lid had been damaged and poorly repaired, and it had rust in the usual places, so it required a fair amount of work to get it ready for painting. See the bodywork page for that story.
First, a couple coats of epoxy primer on the trunk lid and its internal frame. The paint texture over the body filler looked a little different from the unfilled areas, but that difference disappeared after the polyurethane primer was applied.


I ended up shooting several coats of the polyurethane primer, with intermediate sanding to smooth off the repaired area. Finally, I sanded it with 600-grit paper in preparation for painting.
To get a little experience with the paint, where flaws wouldn't matter, I first painted the inside of the trunk lid and the stiffening frame. This was the first color coat I applied; I liked the color.


After painting, the outer surface was wet-sanded with 1000-, 1500-, and 2000-grit papers. It was then polished with Meguiar's 105 and 205 polishes. Below, you can see an area that has only been wet sanded, compared to the area polished with 105. The difference is striking.

The following two pictures show the lid after polishing with 105 (left) and 205. It's difficult to see the difference in a photo, but if you look along the edges of the reflections, the difference in smoothness becomes clear.


After polishing, I gave the lid a coat of carnauba wax.

I wasn't happy with the trunk lid, as it had a few obvious flaws, including one sag and two small dents that I didn't see until the paint had been applied. I didn't want to repaint it right away, as I wasn't sure that I would have enough paint for the rest of the car. So, a few months after the car was (nominally) finished, I removed the lid and repainted it. After that, I was much happier with it.

Doors
The door internals were removed for restoration. That gave me good access to the door interiors for repairs and rust treatment.
The upper insides of the doors were a little rusty, probably because they hadn't been painted adequately at the factory. I treated them with rust converter and rust encapsulator. The lower inside surface, which is a common rust point, was OK, but I sanded it lightly and painted it with rust encapsulator for further protection. I didn't repaint the rest of the doors' insides; I like having a little original paint, somewhere in the car, if only for archival purposes. And, as long as the paint is in good shape, repainting is just not necessary.

The left door apparently had a tough life. It had some repaired dents, the worst of which was a deep dent in the lower front. Since I found body filler over rust in the trunk lid, I wanted to make sure there was none in the doors, so I removed all the filler. That also gave me a chance to fix the dents a little better. There's a limit, however, to what can be done without removing the door's outer skin, and I just wasn't going to try that.
The right door was much better; only one small ding, easily fixed. I also found a couple more low points, almost invisible, which I fixed. I suspect they existed since the car left the factory.
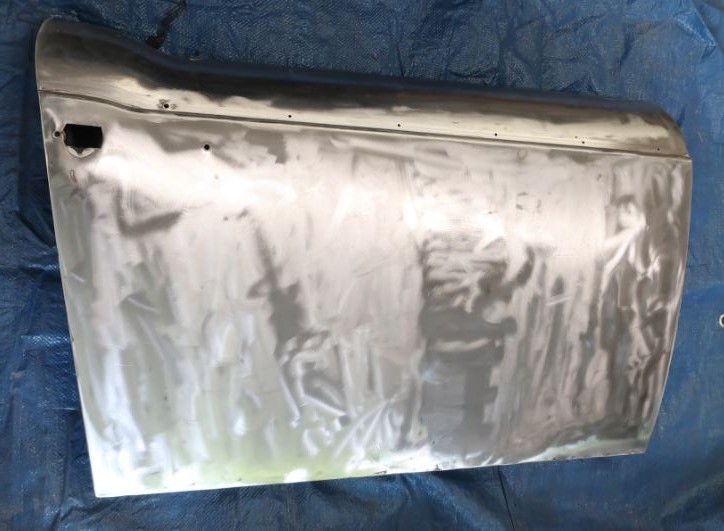
As with the trunk lid, fixing the door involved applying filler and sanding until the surface was level and smooth. After a couple cycles of applying body filler, sanding it, and checking for flatness, I decided that the left door was ready for paint. The right door had a couple minor dents, almost invisible, which I filled easily.


The doors received two coats of epoxy primer.


After a light sanding, I applied polyurethane primer-surfacer. The right door received two coats; because of the repair work, I expected the left door to require more sanding, so it received three. I sanded the doors with 320-, 400-, and 600-grit paper. After the 600, they were smooth as a baby's butt and ready for paint.


Although the polyurethane primer is sandable to a smooth finish, it is initially surprisingly rough. This is not true of all polyurethane primers; the one I used on my MG TD was much smoother. I had planned to use polyurethane primer over epoxy throughout, if only to have a more durable finish, but decided to paint color directly over the epoxy in less visible areas. The appearance was better, and it was far less work.
Like other body parts, the doors received three coats of paint. That seemed to be necessary for a really nice finish, and it allowed color-sanding with less worry about sanding through.


The usual: wet sanding with 1000-, 1500-, and 2000-grit paper, followed by buffing with Meguiar 105 and 205 polishes.

Below, the door with the paint and mechanical work completed and a coat of carnauba wax. The outer trim pieces and panel still needed to be installed; I planned to do that when I installed the interior.

The restored hinges also were epoxy-primed, painted, and hung on my drying rack (AKA orange tree).


Fenders
Rear Fenders
I started with the rear fenders, which were in good condition. Plenty of undercoat, not much rust, and only a couple minor dings.


TR4 and 4A fenders' most common rust areas are the lower parts of the wheel arches and the lip along the top. The rust in those areas was, at worst, minor; no need for any repairs. I took most of it off with a rotary wire brush.
I cleaned and stripped the fenders in the usual manner. First, a power scraper and a heat gun, to remove most of the undercoat, then a wash with mineral spirits, to remove the residues. Below, the left rear fender sans undercoat.

That was followed by a polycarbide disk, along with a little hand sanding and wire brushing, to strip the paint.


As with the body, I found a small crack near the lower rear corner. Easy to repair; I just stitch-welded over it, ground the weld flat, applied a smear of body filler, and sanded it smooth. I checked the other fender, and it had a smaller crack in the same area, which I repaired similarly.


I gave each fender two coats of epoxy primer, inside and out, of course. Below is the left rear fender, primed, not quite dry.

On lower edge of the right fender, I found a poorly repaired dent, probably from the same incident that reconfigured the rear valence. I took off the thick layer of old body filler, hammered out the dent, and reapplied a much thinner coat of filler. I filled anything that wasn't perfectly level, notably a few minor dings, some of which were so slight that they probably would not have been visible after painting. Primed, the fender looked really good.


Next, two coats of polyurethane primer-surfacer and lots of sanding. The usual 320, 400, and 600 grit papers.


I gave each fender three coats of paint on the outside and two on the inside. I ended up with a bit of orange peel on the right fender; annoying. The left, which I painted next day, was much better, though, as I used a bit more reducer and higher gun pressure.


Below, the finished fenders after wet-sanding, buffing, and waxing. Not a trace of orange peel remained on the right fender!


The fenders were installed, and the rear of the car was finished.
Front Fenders
Below are the two front fenders with all the trim removed. The left one has a couple of obvious small dents.


These were the last body parts to be painted.
I removed the tar undercoating from the insides of the fenders in the usual way, with a heat gun and power scraper. In the pictures below, the bulk of the undercoat has been removed, but some residues remain. Those were removed with mineral spirits.


That was the last of my undercoat-scraping, and I wasn't sorry to be done with it.
The fender's mounting lip has a series of holes for quarter-inch speednuts. The thin strip of metal at the bottom of each hole is essential for holding its speednut in place, but several were broken.

I made some reinforcements from 20-gauge steel. To mount them, I drilled holes on both sides of the mounting holes and plug-welded them into place.


The fenders were stripped in the usual way: mineral spirits removed the undercoat residue, and a polycarbide disk on an angle grinder removed the paint. The inside had some rust in the predictable spots. It was not bad, with no penetration, so it was easy to treat.


Again, signs of repaired dents; the white spots in the picture below are dimples where it appears that a dent puller was used. The panel, however, is flatter than I'd have expected; it didn't look like it had ever been dented. Whatever its history, the cure was to fill the dimples and other remaining uneven spots, then sand it all smooth.

I find it interesting that the car had quite a bit of bodywork in its lifetime, but no serious damage. The frame was factory straight and, based on the paint layers, all the body panels were original.
The usual collection of small dings and irregularities, as well as the dimpled area shown above, were filled with body filler. The fenders were then primed with epoxy. The epoxy primer is relatively slow to cure; I gave it a week to harden completely.


The fenders were scuff sanded, cleaned, and given three coats of polyurethane primer-surfacer. Then, the usual three levels of sanding (320, 400, and 600 grit) and three coats of color.


The fenders were wet sanded with 1500 and 2000 grit paper, buffed with Meguiar 105 and 205 polishes, and waxed with carnauba wax. Below, the finished left fender, mounted on the car, with the trim and sidelights installed.

Hood
The hood required a bit of work, including bracing to strengthen it near the rear crossmember, a well known weak spot. It also had a number of small dents and old damage, which I fixed as well as I could without taking it completely apart. In preparation for paint, I spread a thin coat of body filler over the repaired damage. As with the fenders, I filled all the low spots, even if they seemed very slight. Getting everything right required several applications of filler with intermediate sanding.

The usual process: after cleaning, two coats of epoxy primer. The epoxy primer has a rather long drying period, so I couldn't give it the essential light sanding for a couple of days.


Next, three coats of polyurethane primer-surfacer on the top surface only. Two coats might have been enough, but I anticipated a fair amount of sanding, so three seemed prudent.

As expected, I had to do quite a bit of sanding, shoot even more primer, and repeat a couple times until it was completely smooth. Then three coats of color on top, two on the underside. Below, the hood has been painted but not yet wet-sanded.


The finished hood, ready for installation.
Hinges
The hinges were a little tricky to restore. The complicated shape made stripping them difficult; abrasive blasting would have been the best way to strip them, but I didn't have a blast cabinet, so I wire-brushed and hand-sanded them. The hinges used a large rivet, which I had to drill out. (I later replaced it with a bolt.) I derusted, primed, and painted them in the usual way.

